Blog Post Title: DIY Insemination: A Step-by-Step Guide
DIY insemination, also known as at-home insemination, is the process of using self-insemination techniques to get pregnant. It is a popular option for couples who are trying to conceive but are facing fertility challenges or for single women who want to start a family. While it is always recommended to consult a doctor for medical advice, DIY insemination can be a cost-effective and convenient option for those who want to take matters into their own hands.
In this step-by-step guide, we will discuss the necessary preparations, tools, and techniques for a successful DIY insemination.
Step 1: Know Your Cycle
Before attempting DIY insemination, it is essential to understand your menstrual cycle and when you are most fertile. This knowledge will help increase the chances of getting pregnant. Ovulation typically occurs around day 14 of a 28-day cycle, but it can vary for each person. You can track your ovulation using fertility tracking apps or by monitoring your body’s temperature and cervical mucus.
Step 2: Gather Your Supplies
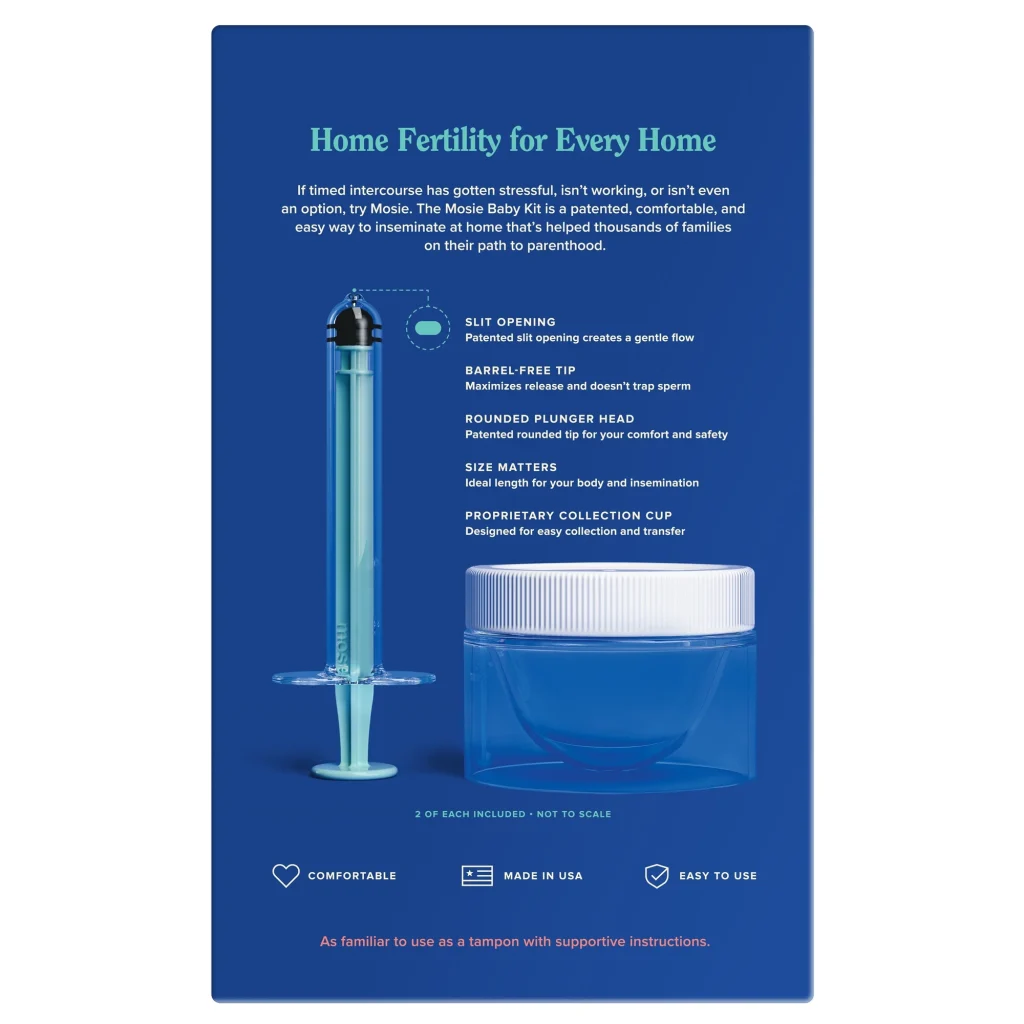
To perform DIY insemination, you will need a few essential items. These include a sterile syringe, a clean cup, a speculum, and your donor’s semen. You can purchase a sterile syringe from a pharmacy, and your donor can provide the semen through ejaculation or by using a sperm donor kit. Make sure to follow the instructions on the sperm donor kit carefully.
Step 3: Prepare the Environment
It is crucial to create a clean and sterile environment for DIY insemination. Start by washing your hands thoroughly with soap and water. Then, disinfect the surfaces and tools you will be using with rubbing alcohol. It is also recommended to take a shower and wash your genital area before the insemination.
Step 4: Get Comfortable
To make the process more comfortable, you can lie on your back on a bed or couch with your feet raised against a wall. You can also use pillows to elevate your hips for easier access to your cervix. It is essential to stay relaxed and not to rush the process.
DIY Insemination: A Step-by-Step Guide
Step 5: Insert the Speculum
Using your fingers, gently open your vagina, and insert the speculum. This tool will help keep the vagina open, making it easier to access the cervix.
Step 6: Load the Syringe
Remove the plunger from the syringe and draw the semen into the syringe. If using a sperm donor kit, follow the instructions provided to load the syringe correctly. Make sure the syringe is filled with the right amount of semen.
Step 7: Insert the Syringe
With the syringe in hand, gently insert it into the vagina, aiming towards the cervix. Slowly and carefully release the semen into the cervix, making sure not to inject it too forcefully. Once all the semen is released, remove the syringe and discard it properly.
Step 8: Clean Up
After the insemination, remain lying with your hips elevated for 10-15 minutes to allow the sperm to reach the cervix. Afterward, you can clean up by removing the speculum, wiping off any excess semen, and washing your hands.
Step 9: Rest and Monitor
It is essential to rest and relax after DIY insemination to increase the chances of successful fertilization. You can also use this time to monitor your body’s reaction and any potential side effects. If you experience any discomfort or pain, consult your doctor immediately.
Step 10: Repeat the Process
DIY insemination is not a one-time process, and it may take a few attempts before achieving a successful pregnancy. It is recommended to repeat the process during your fertile window for the best results.
In summary, DIY insemination can be a viable option for couples and single women who want to conceive. Before attempting this process, make sure to understand your menstrual cycle and gather all the necessary supplies. It is crucial to create a sterile environment and remain relaxed during the insemination. Remember to monitor your body’s reaction and repeat the process during your fertile window for a higher chance of success.
Leave a Reply