


Q: Can a home insemination kit really be a practical alternative to IVF for some families?

Q: What matters most for ICI success—supplies, position, or timing?
Q: With legal stories in the news, how do you protect your family plan when using a donor?
A: For many people, at-home insemination (ICI) is a real, accessible starting point—especially when you keep the plan simple and timing-first. The biggest needle-mover is usually the fertile window, not fancy add-ons. And yes, the legal side deserves attention, particularly with recent headlines about at-home insemination disputes and donor parentage questions. You don’t need to panic, but you do need a plan.
The big picture: why ICI is trending again
Pop culture makes pregnancy feel like a constant scroll: celebrity bump updates, surprise announcements, and TV storylines that wrap fertility into a neat episode arc. Real life is slower. It’s also more personal—especially for LGBTQ+ families, solo parents by choice, and anyone working with donor sperm.
At the same time, broader conversations about reproductive healthcare and family law keep showing up in the headlines. Some recent coverage has focused on Florida court decisions involving at-home insemination and whether certain donors can seek legal parent status. The takeaway isn’t “don’t do ICI.” It’s “treat ICI like the medical-and-legal-adjacent process it is.”
If you want to read one of the news items being discussed, see Florida Supreme Court makes ruling in at-home artificial insemination case.
The emotional layer: pressure, privacy, and donor dynamics
ICI at home can feel empowering. It can also feel like a lot—because you’re managing hope, logistics, and intimacy at the same time. If you’ve been watching celebrity pregnancy chatter, it’s easy to compare your timeline to someone else’s highlight reel. Don’t.
Try naming the pressure out loud: “I’m afraid we’ll waste a cycle,” or “I’m worried this will feel clinical,” or “I’m anxious about the donor relationship.” Once it’s named, you can build guardrails.
Quick gut-check before you try
- Privacy: Who knows you’re trying, and who doesn’t need updates?
- Consent and roles: If you’re partnered, who does what during the attempt?
- Donor expectations: Are boundaries clear in writing, even informally?
Practical steps: a timing-first ICI plan (without overcomplicating)
If you only focus on one thing, focus on ovulation timing. Sperm and egg need to meet during a short window, so your goal is to show up consistently for that window—not to micromanage everything else.
Step 1: Find your fertile window
Most people use one or more of these:
- Ovulation predictor kits (LH strips): Useful for spotting an LH surge.
- Cervical mucus changes: Often becomes clearer, stretchier, and more slippery before ovulation.
- Cycle tracking: Helpful over time, less reliable alone if cycles vary.
Step 2: Pick a simple attempt schedule
Many people aim for one attempt around the LH surge and, if possible, a second attempt about 12–24 hours later. That’s not a rule. It’s a practical pattern that keeps timing tight without turning your home into a lab.
If you have limited donor sperm, talk through priorities ahead of time. A single well-timed attempt can be reasonable, especially if your cycles are predictable.
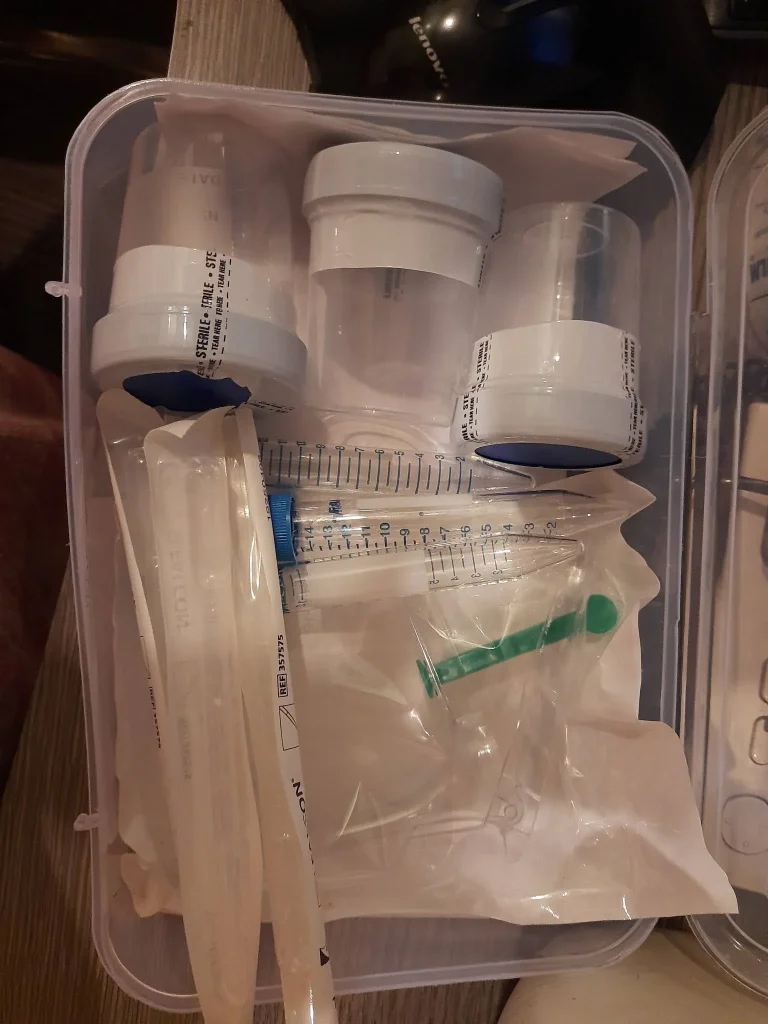
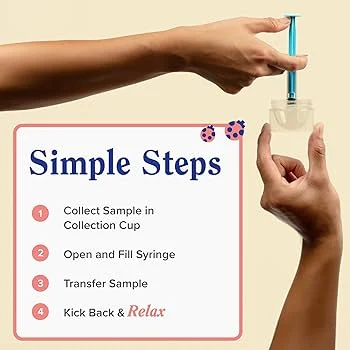
Step 3: Use supplies designed for the job
At-home ICI typically uses a syringe and collection container intended for insemination. Avoid improvising with items not meant for this purpose, since comfort and cleanliness matter.
If you’re looking for a product option, you can explore at-home insemination kit for ICI.
Step 4: Keep the environment calm
Small choices can lower stress: set up towels, dim the lights, queue a show, or put your phone on do-not-disturb. You’re not performing for anyone. You’re doing a time-sensitive, tender task.
Safety and testing: protect your body and your future paperwork
ICI is usually low-tech, but it still deserves safety basics.
Hygiene and infection risk
- Use clean, single-use supplies when possible.
- Wash hands and keep surfaces clean.
- Avoid inserting anything sharp or not designed for vaginal use.
Stop and seek medical care if you develop fever, severe pain, foul-smelling discharge, or heavy bleeding.
Screening and donor considerations
If you’re using donor sperm, many people consider infectious disease screening and clear documentation of intent. The right approach depends on your situation: known donor vs. bank donor, your location, and your risk tolerance.
Legal reality check (especially with known donors)
Recent reporting has highlighted that, in some places, at-home insemination arrangements can create legal uncertainty around parentage. Laws vary widely, and outcomes can hinge on details like whether a clinic was involved or what paperwork exists.
If you’re working with a known donor, it may be worth consulting a family lawyer familiar with LGBTQ+ family-building and assisted reproduction in your state. It’s not about distrust. It’s about clarity.
FAQ: quick answers before your next cycle
Is ICI painful?
Many people describe it as mildly uncomfortable or neutral. Pain isn’t expected. If you feel sharp pain, stop and consider medical advice.
Do positions or lying down after matter?
Comfort matters most. Some people lie down briefly afterward because it feels reassuring, but timing is typically the bigger factor than posture.
How many cycles should we try before changing the plan?
There’s no universal number. If you’re feeling stuck, if cycles are irregular, or if you have known fertility concerns, a clinician can help you decide whether testing, IUI, or IVF makes sense.
Medical disclaimer: This article is for general education and does not replace medical or legal advice. Fertility and parentage laws vary, and individual health situations differ. If you have symptoms, underlying conditions, or questions about screening, medications, or legal parentage, consult a qualified clinician and/or attorney.
CTA: make your next attempt simpler—and better timed
If you’re trying ICI at home, build your plan around the fertile window, keep supplies straightforward, and don’t ignore the legal context if a donor is involved.